|
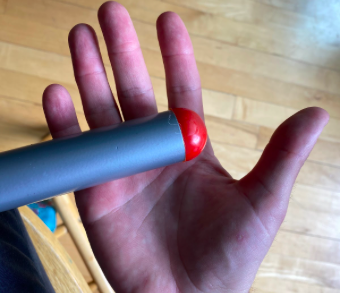
The outboard hand has two main functions: leverage and control. On the drive, the outboard hand is the most direct part of your body that applies power to the oar. Around the release and on the recovery, the outboard hand gives you the best control over the path of the handle (and blade), and the height of the blade over the water. That means we’re asking a lot of our outboard hand: within a single stroke they have to be powerful and aggressive, but also delicate, dexterous, and careful. That’s quite the task! In this article, we’ll break down the role of the outboard hand through the back half of the stroke, from arm draw, to extraction, to the beginning of the recovery. Applying Downward Pressure The first thing to recognize about the outboard hand is how it contributes to the height of the blade. A squared blade naturally wants to sit at about the right height for the drive (almost entirely submerged underwater). Let the equipment do most of the work for you: think of this squared and buried position as the default resting place for the blade. You don’t have to do anything to keep it in this position. That means you don’t need to do anything to keep the blade in position on the drive. Focus all your energy on the horizontal application of power--the vertical component will take care of itself! When you want to control the height of the blade, keep it simple: all you need to do is apply downward pressure on the handle. You can do this with just one finger if you wanted to. Next time you’re in a boat, try this: sit squared and buried at the release. Take your hands off the oar except for your outboard index finger. Push down on that finger gently and lightly: the oar extracts cleanly and easily out of the water. Now relax the downward pressure: the oar returns to the water. And this took very little effort to accomplish. This is what it means when coaches talk about “weighting” and “unweighting” the hands. Anytime the height of the blade changes (i.e. at the catch and at the release) this is the economy of movement you want to strive for. Hand Position at the Release What should the outboard hand look like around the release as you extract the blade by applying downward pressure? Well, here’s a few pictures (this metal bar was the closest I could find to an oar handle in my house). 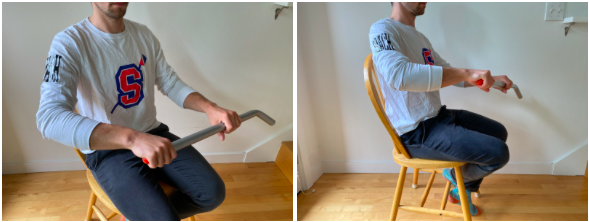 The final arm draw. In this photo I am finishing the arm draw of the drive. The (theoretical) blade is still fully buried, and I’m squeezing in towards the sternum. Note the outboard wrist is flat. At this point, the outboard hand is focused mainly on a powerful, horizontal draw. There’s not much finessing required at this point. 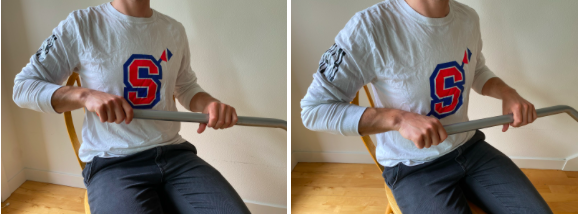 The very end of the drive. The elbow is away slightly from the body, but not a mile high into the air; it has also not gone past the body. The wrist is still flat, not cocked up. There is a slight lateral twist from the wrist, and the end of the oar has swiveled ever so slightly in my hand. Note that the blade is still in the water, and I am just about to begin the extraction. This is when the power winds down and the finesse takes over. 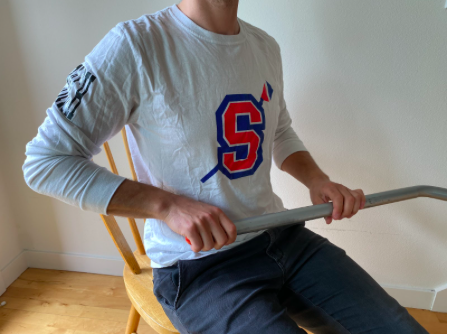 The extraction. This part of the stroke should be all about precision and finesse--the drive is over, so you shouldn’t be doing any yanking with that outboard hand. This is where you want to think about “weighting” the outboard hand to apply vertical, downward pressure. It doesn’t take very much force. Properly timed, this will slip the blade out of the water cleanly and easily. At this point, the inboard hand does the feathering (but that’s a topic for another article). Make sure the outboard wrist doesn’t bend here--you want to stay ON TOP of the handle, and let the handle just rotate underneath your hand as the feathering happens. You want your grip to be just enough to maintain control, but not so much that the handle can’t rotate in your hand. The Recovery The crucial responsibility for the outboard hand on the recovery is just maintaining a level height of the blade above the water. You do this by maintaining just the right amount of downward pressure on the blade, like we previously discussed. 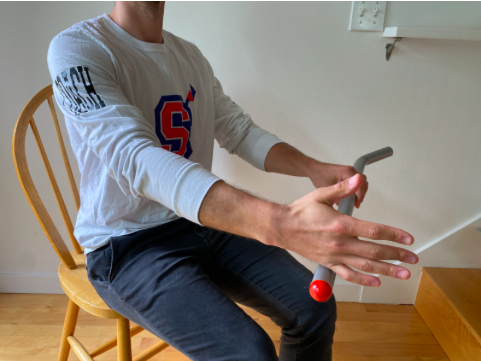 Try this! The karate chop recovery: instead of the usual outboard hand grip, replace it with a karate chop. You can’t lift the oar, or even really hold it in place. It limits you to think about your downward pressure only. All you are doing is counteracting gravity, which wants to drop the blade into the water. As you take the recovery, look out at the blade, and make sure the height of the blade stays consistent above the water. Notice how an inconsistent application of downward pressure means you can’t hold the blade level on the recovery. Conclusion
The outboard hand is a crucial connector between the equipment and the rest of your body. Don’t overthink and don’t overpower it (on the recovery at least!). There’s a time for really powering, and there’s a time for finesse--knowing when to balance these tasks is a crucial skill for getting the most out of the outboard hang. Comments are closed.
|
Archives
April 2023
Categories
|
|
Sammamish Rowing Association
5022 W. Lake Sammamish Pkwy NE Redmond, WA 98052 [email protected] 425-653-2583 |
Mailing Address:
Sammamish Rowing Association P.O. Box 3309 Redmond, WA 98073 |
|
